Check back often

Have you checked out all my blogs?


Dollhouse Minis: http://joannesminis.blogspot.com


18” Dolls: http://joannes18dolls.blogspot.com/


General Crafts: http://joannes-place.blogspot.com/


Cooking: http://joanne-kitchen.blogspot.com/


Also if for some reason I can't post I will try to give a head's up on the Facebook page so check there too.

Thursday, January 30, 2014

Dollhouse Miniature Plant Pot


This week for Trash to Treasure Thursday I am going to show you another one of those old standby ideas that has been around for longer than I can remember.

I know it is getting harder to find this style cap on toothpaste I still find them on other products that come in tubes. Everything from glue to haircare products and so many other things come packaged this way. Just look around your home and I bet you will find a bunch of these caps. For this we need the old fashioned kind that you screw off to use the product and not the kind that has the hinged lid on them. I think this cap was on a tube of Ultra-Bright toothpaste in case you are wondering.

You can of course paint the caps just about any color you desire or do like I did and leave it white. Also many of the lids on other products come in other colors. I know I have glue with caps this style right now and those caps one of them is blue and one is red and there are probably other colors out there depending on the products they are on.

The only other items you need for this are some Styrofoam, some paint, some glue and some kind of plant to put in your pot.

Like all Trash to Treasure projects this supposed to be fun and easy. It isn't supposed to be a masterpiece, so have fun, look around and see what you can come up with. 


Sunday, January 26, 2014

Dollhouse Miniature Valentine Candy


This week I am finally getting around to doing a project I have been meaning to do for a long, long time. We are making some twirly pops and some unicorn pops. These just look so yummy and they are soooooo simple to make too.

I show you how to make them in 1/12th scale for Valentine's Day but you can make them in any scale in any color combination for any time of year. These also come in all sizes so you can work bigger if you like, scale while still important is not so critical, big is okay.

I think the only constant in these types of candies is that we need to start with a white sugar base. For this I really like the Fimo Pearl, it has sugary sheen without being shiny. If you look at the real pops they have an almost pearl look to the white sugar. Sometimes I add some translucent clay to my white (and to the colors) but sometimes I don't. I think with the addition of the translucent clay you a product that looks like the more expensive real candies and without like in today's project they look more like the cheaper ones you might find in the average grocery store. So go for the look you are after on these. I do find that in the Fimo line the soft colors tend to be a bit translucent out of the package unlike the classic colors.

For Valentine's Day we are working in pinks and reds for our colors, with a splash of purple since it is my favorite color and that was what the twirly pop I purchased had. You can use whatever colors you want. This is a good project to use some of those beautiful colors of polymer clay that we buy just because they were beautiful.

The twirly pop I purchased was about 2 ½” in diameter but they come from smaller than that to absolutely huge, so have fun and be creative. The unicorn pop was around 5” long so in 1/12th scale that would be just under ½” (7/16” if you want to be accurate) but again they come in all sizes.

If you make some of these be sure to post a photo on the my joanne's minis facebook page. I love to see what you are making.


Thursday, January 23, 2014

Dollhouse Miniature Coffee Cup


This week for Trash to Treasure I show you how to make a super simple coffee cup like you might get at your favorite coffee place to take with you. This really couldn't get simpler.

And remember you don't need to limit yourself to just the caps from glue bottles, look at other products you use every day. I'll bet you will find similar caps other places. 


Sunday, January 19, 2014

Putting the Brookfield back together


This week we are going to put everything back into the Brookfield and put the house back into my living room. I talk a bit about the problem with the floor in the both the bathroom and kitchen. I ask you all a question and we look at the different pieces of furniture as we put the house back together.

Here are the pictures I took of the rooms and contents of the dollhouse. I hope you enjoy them. If you have questions be sure to ask.


my middle son made this paper crane when he was into doing oragami


this photo album was hiding in the magazine rack


when I put in the floor it was the same color as the rest of the white in the kitchen


Thursday, January 16, 2014

Dollhouse Miniature Glasses


This week for Trash to Treasure Thursday I thought I would show you an easy way to make either a pair of reading glasses or a pair of sunglasses to use as an accessory in your next miniature scene. I am not sure if you could fit them to a doll to wear since I have never tried.

You really only need two materials some decorative wire (look where they have jewelry making supplies) and something to form the lenses. In the video I used some glass stain paint but I have also used clear nail polish the same way. You can also use a clear drying glue for this. Really anything that dries clear will work. I like the glass stain paint for making sunglasses since it comes in so many colors and I already have several bottles of it since I use it in some many mini projects. The nail polish was something I tried on a whim and it worked great for clear lenses, I am sure it would work for sunglasses too as long as you used a sheer color of polish.

The only really downside to this project is that you will have to mess around with the wire to get the shape correct. Also they tend to give into gravity over time and you may need to go back and do some minor reshaping over time. Maybe a slightly heavier wire would fix that but it would be harder to shape for the lenses.

Just play with the technique and have fun, after all that is what these Trash to Treasure projects are all about having fun with our minis.


Sunday, January 12, 2014

The Brookfield- Adding the Cover


This week we are adding a protective plexi-glass cover to the Brookfield. This will be very similar to the cover that I added to the Toy Store a couple of years ago. That project is one of the most asked about projects I have ever done so I hope I answered most of your questions here in this video. If not I will be adding a cover to my big dollhouse (the Harrison) sometime in the near future and we can go over it again then if need be.

I was sick most of this week so sorry if I am not as clear as I should be on the video (cold meds do that to me) but I did my best to get the information to you.

The channel is simply made of two pieces of strip wood, a 1/8” by 1/8” strip glued to the edge of another strip approximately ½” x 1/8”. I added a couple of photos of the channel at the end of this blog post.  Be sure to double check the thickness of your piece of plexi-glass to be sure it will slide through the channel created by the 1/8”x 1/8” piece. You can use a bit larger if need be but this size should work with most of the plastic commonly sold in home improvement stores.

I picked up a cutting tool when I got my plastic this time and it worked nicely for cutting the sheets. If there is interest I would be happy to do a tutorial on how to cut the sheets of plastic when the weather is better outside. I do recommend you do this task either outdoors or at least over a hard surface floor because there will be tiny bits of plastic left from cutting and they are as bad as little pieces of glass if you get them on the carpet.

I like to cut my plastic pieces before I put the tracks on the building since it is much easier to move the track prior to gluing that to re-cut the plastic pieces.


channel piece end view

channel piece side view


Thursday, January 9, 2014

Wall Art for the Dollhouse


This week for Trash to Treasure Thursday I thought we would make some use of those calendars we are done with from last year. It is also a good time to plan for next year and pick up this year's calendar with decorating your dollhouse in mind.

If you don't have a calendar from last year don't worry you can still pick up a new one at the dollar store for a dollar and use it. The regular stores will be discounting their calendars to half price in a few months too so keep your eyes open you'll find one to use.

I actually picked last years calendar with the idea that I wanted to use the art work for my minis. Like I said in the video I remembered a photo of an art gallery that I saw once a long time ago. The art in this gallery were large close ups of flowers and they were just on the stretched canvass. They may have been either paintings or photos it doesn't matter it is the look I am after not a direct copy. By just using something firm as a base to glue your art work onto you have the same look.

For other calendars you might want to use a frame you can either buy a frame at a mini store, online or make on yourself. We made some really cool “antique” frames for a Trash to Treasure a few months ago that would work.

Since calendars come in so many styles to fit into our real size homes and offices I am sure you will find the perfect calendar to decorate your dollhouse with.


Sunday, January 5, 2014

The Brookfield a project overview


This week we are starting a new group of videos. I had already planned to put a plexiglass cover on my Brookfield this month but then over Christmas I realized I have neglected the dollhouse so much that it could use some work. So this week I take you on a short tour of the house, we glue a window treatment back in place and do some basic cleaning.

Next week we will start on the track for the cover, I will be doing a very similar cover to the one that I put on the Toystore a few years back. This time I will take more time and show the pieces more thoroughly since that is one of the projects I still get tons of questions on. When I did that video I wasn't expecting everyone to want to see that track piece better. Also this time the track will be lighter colors so it will be easier to see. Also I might have to adjust the basic track piece to accommodate the roof material that is on the Brookfield.

So let's talk about the this dollhouse. The Brookfield is the first dollhouse that I actually completed (well mostly completed there still aren't lights installed even though it is wired)

The kit was made by the Dura-craft company which is no longer in business. The kit was made exclusively for sale at JoAnn Fabric stores and was relatively inexpensive. One of the nice things that this company did was they included enough roofing materials in the kit to finish the kit. You really only needed to buy glue, paint and whatever floor coverings and wall coverings you wanted. I think they also might have included enough wood flooring for one level too but I am not sure. I did add some siding to the outside of the house just because I didn't want the smooth wood siding but you wouldn't have had to do that.

The floor plan is the typical small two story dollhouse floor plan of 2 rooms downstairs with 2 upstairs and a staircase in the center. I did turn the stair case around so that it came down to the front door rather than to the back to make the house look more realistic.
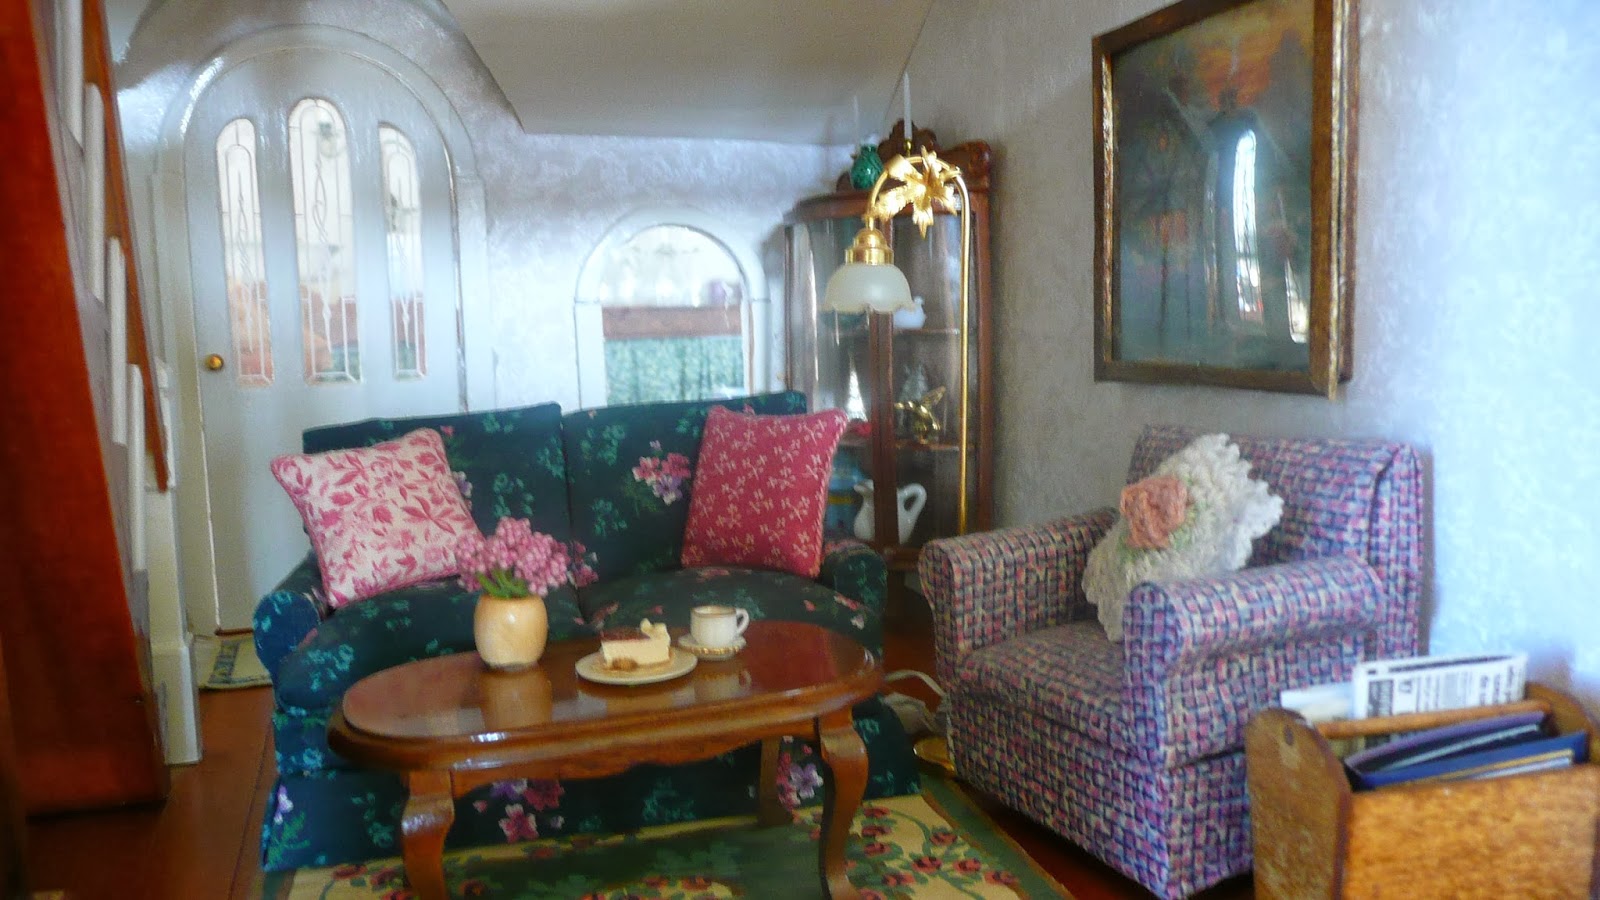
After we get the cover in place and I put the furnishings back in we will do a more in-depth tour of the house. If however you noticed anything in the video as I was taking it out of the house that you want to know more about be sure to ask. I will do my best to fill in the blanks as to where it was purchased or if I made it I would be happy to do a video on any of the items from the house.

Also at the end of these videos we will look at the landscaped board the house sits on too. We will (hopefully) be making a similar board for under and around my Harrison (my large dollhouse) later this year. I have been planning to landscape and finish that dollhouse for a long time now so I am hoping we can get to that this year. I really enjoy doing the landscaping stuff and I hope you will all learn from those projects.