Check back often

Have you checked out all my blogs?


Dollhouse Minis: http://joannesminis.blogspot.com


18” Dolls: http://joannes18dolls.blogspot.com/


General Crafts: http://joannes-place.blogspot.com/


Cooking: http://joanne-kitchen.blogspot.com/


Also if for some reason I can't post I will try to give a head's up on the Facebook page so check there too.

Sunday, June 24, 2012

Peppers


For this week's video I am showing you how to make a few different kinds of peppers. I was originally going to do a bell pepper video and then catch the Sweet Mini peppers and the Jalapenos in later videos when time permitted. When I was picking up my peppers in the grocery store to have as models I realized that the different sizes were all the same colors. At that point I knew this had to be one video, no sense mixing exactly the same clay colors multiple times. Between the three kinds of peppers there are really only two main sizes/ shapes of peppers.

The one factor of combining the videos into one video that I didn't see far enough ahead to realize was the fact that I was setting myself up to make a bunch of peppers. I'm talking in the hundreds. Since I have other things to do besides making mini peppers this project took me a week and half working on them whenever I could justify it. By the end I really didn't want to ever see a pepper (real size or mini) ever again. LOL

When I planned the project I really wanted to use the bushel baskets that I showed you how to make a few weeks ago (same ones that the mushrooms are in) for the sweet mini peppers and the jalapenos. I knew the bell peppers would work wonderfully in the larger baskets. So I started making batches of mini peppers, huge batches. After every plate full was baked off I would think “OK, this will be enough to fill the basket” but no still not enough. After I had around 200 sweet mini peppers done and there was still a lot of basket to fill I decided to see how far up they would fill the same boxes I used last week for the cherries. I was so happy to find I had plenty to fill that box. Since the bottom of that particular box is solid I didn't have to make nearly as many of the jalapenos, I filled in the bottom with plain clay of the same color and baked it off. Then made just enough peppers to fill in the top layer.

Like a lot of produce peppers have a slight shine to them, they are not a flat, matte color. In this video I show you my preferred clear finish for fruits and vegetables, Future Floor finish. I have had the bottle that I use for a long time (probably 10-15 years) and I have hardly used any. I did look online and the SC Johnson company still makes it, they changed to name to Pledge with Future finish so it is still available. This is one of the simplest of finishes to use, just put the items you want to coat in a small container, add a tiny bit of the finish and stir. Pour the clay items out onto a foil lined tray or plate to dry, stirring them so they don't stick together. The finish is so natural looking when it dries not too shiny but not dull either.

The clays I used in this video are the following

All are Fimo brand:
Transparent White
Sunflower
Tangerine
Red
Leaf Green
Tropical Green

If you want to make other varsities of peppers use the same idea to come up with what you need for your project.
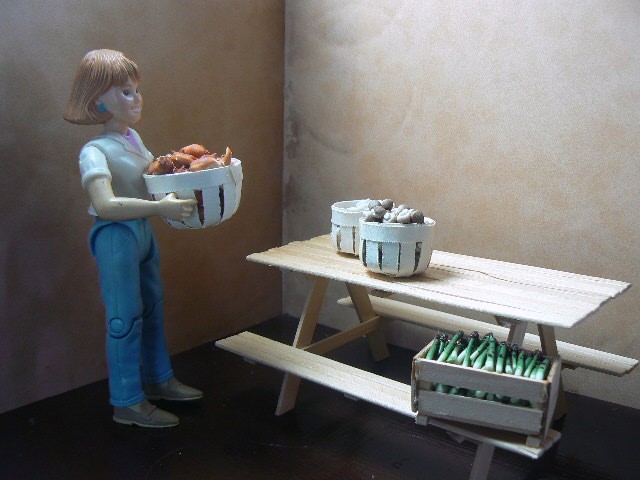
Now the photos

The peppers, just a close up shot of the peppers I made this week. 
 

All of the produce on the table together

Wednesday, June 20, 2012

Translucent Clay Test


Have you ever wondered if there really is a difference between the brands of translucent polymer clay on the market? I got to wondering that very thing this week while working on next week's video. I had three brands of translucent clay on hand and started to wonder if it really made a difference which package I grabbed. I did a quick test bake on one of the colors of clay I was going to use, picked a brand and went ahead with the project. Then I got to thinking I should do an actual test of the different brands and post a blog here about it showing you what I discovered.

So my first step was to research which brands of polymer clay even have a translucent clay. I found that Sculpey III has a translucent which I didn't have on hand. I also looked at the Claysmart store brand available at Michael's craft stores the store that we checked did not carry a translucent so I don't know if they carry one or not since their website only tells me that they have 15 vibrant colors, not what colors they have. (at least not that I could find) I did not look at Kato brand because I can't find it locally so I knew I would not get it in time for this test.

I did pick up a package of the Sculpey III translucent to use in this test. I also purchased blocks of fimo in a red and a black to test the effects of the different clays.

So the clays used in this test were:
White Translucent by Premo! (made by Sculpey)
Translucent by Sculpey III
Transparent White by Fimo
Translucent by Cernit

For the colors of clay I used:
Cherry Red by Fimo
Black by Fimo


I wanted to use a red because that is the color I find shifts the most when baked or mixed with other colors. The black I chose because when we want black we want it to stay black not grey so I wanted to see if the pigments in the translucent clays lightened it at all.

In preparation for the test I marked off areas and marked them for the different brands of clay and also an area for the red and black that I wanted to bake straight from the package.

To do the test I thoroughly conditioned all the clays separately. I was very careful to keep everything clean between clays with wet wipes, especially important with colors this dark.

Next I rolled each clay out separately with my pasta machine to the number 3 thickness. I wanted to make sure that all pieces were the same size and thickness for the test. I used the same size round cutter with each clay to make pieces the same size. I then combined the different brand of translucent clay with the two colors. I made sure that I used wet wipes between and also that I combined the clays very well.

I then re-rolled the translucent/color mixtures through the same #3 setting on my pasta machine. 


I baked everything together on the paper plate at 265 degrees Fahrenheit for 7 minutes.

Overall for mixing into colored clay I really don't see a big difference between the brands. The black stayed black in all my samples and is virtually the same in all samples. Same with the red, they are all virtually the same both in color and overall look.

The biggest difference is in the translucent by itself. That varied immensely from brand to brand.


So by brand here are my observations:

Sculpey III
This clay is soft but was one of the most difficult to mix into the colored clay for some reason. The plain sample did turn somewhat yellow and is not very translucent. I would say this would work well if you are mixing it just be careful to mix thoroughly so you don't get streaks. 


Premo (also made by the Sculpey company)
This was the hardest of the clays and very difficult to mix into the colors however it was probably the oldest package of clay I used in the test. I think I opened it about 3 or 4 months ago possibley longer ago. It also turned a bit yellow but not as much as the Sculpey III and was slightly more translucent.


Fimo
This my usual go to brand. It mixes well and is easy to use. It is slightly more translucent than the either of the clays made by the Sculpey company but it does have a cloudiness running through the baked sample.

Cernit
This is the one that surprised me the most. I only see this one for sale at one local store and picked up a package a few months ago to try. It was still sealed in its package this morning because I hadn't gotten around to trying it out. When I first touched the clay I did not have high hopes for it. First off it was very, very soft and sticky. Also it was very white, I really thought it was going to fail this test. However this clay proved me wrong. Once I got it mixed in (this took a while because it was so soft and sticky) and baked it I was very happy with how translucent this translucent clay really is. You can clearly read the name of the clay through the disc of baked clay. 


So what do I think after running this test, I think for day to day use when mixing the translucent clay with another color I will buy whatever is on sale. It really didn't make a huge difference but when I want to use the translucent by itself I am definitively going to be using the Cernit Translucent. I have had a few projects in the back of my mind for a while but I couldn't find a clay that was truly translucent up until now.


Sunday, June 17, 2012

Mini Cherries


This week I decided to make mini cherries mainly because I wanted to indulge my love of cherries and I could justify buying extra to have for models for the video. LOL They truly are one of my favorites of the summer fruits so it made them even more fun to make the video for all of you.

I found that my package of Premo crimson clay was a very good match color wise for the cherries I had on hand so that made for an easy selection of color. Just match the cherries you find in your store to the clays you have, you might need to mix to get a good match in other brands of clay or with cherries from a different location. Do keep in mind that red clays do get darker when you bake them so keep that in mind when choosing (or mixing) your color.

For this demo I used a new box that I had designed based on another one I remember from those trips to get produce in the summers of my childhood. This one has a more solid bottom and is much more shallow so we don't need to make so many cherries to fill it. I will demo the box in a few weeks, and I am planning to use it again for some berries and such.

Even though the box not nearly as deep as the other containers I had on hand I still didn't really want to make enough cherries to fill it up from the bottom. The solution I came up with was to fill the bottom of the box with some clay by firs spreading some TLS on the bottom and then using a ball stylus to press the clay into the bottom. I made sure to leave the top rough so that the next layer of cherries would fall more naturally. Next I added several layers of small balls of clay all about the size that the finished cherries would be. Throughout the layers of these little balls of clay I added small snippets of the glue stiffened thread that I would be using to make the cherry stems later. By doing this I gave the illusion that there are a lot more details that there really are. You can see some of those “stems” from the top thus fooling the eye into thinking that there are cherries there instead of just the balls of clay. 


When I got to the top layer I started making the actual mini cherries adding the stems to the tops. I didn't really need as many as I thought I would since the stems are visible from below. Remember you don't see the stems on every cherry in the box in real life either. Some have lost their stems and some are turned the other way. So the illusion is there without as much work.


These cherries would look so wonderful in a small bowl on the counter of your dollhouse kitchen or even on a mini paper towel next to the kitchen sink like they are drying from being washed. I may have to do just that with a few of the extra cherries I made.

The rest of the pictures this week show the box of cherries with the rest of our growing collection of produce. 


I hope you are enjoying this series of videos, be sure to request your favorite items of produce. I am making a list and working from it as I have time and as the different types of produce show up in the stores.

Wednesday, June 13, 2012

Michael's Haul


Since Michael's is having a sale on polymer clay this week I decided that I should probably go and see if any of the colors would tempt me at all. Lately I have been buying more and more Premo brand clay simply because the Michael's I go to normally doesn't carry much in the the Fimo line. They have some Premo but most of the clay space is taken up by Sculpy III and their store brand clay neither of which use very much (both do have their uses and I will cover that in another post someday)

Today I actually went to the Micheael's that is closest to where I live instead of the one closer to where I do most of my shopping. I went to this location for a couple of reasons, I didn't want to make the longer trip just to check out the clay section and my daughter just got a job at the store closest to where we live.

I was so happy to see that this location had so much more selection in the Fimo line. I ended up getting 8 different colors of Fimo (they were 4 for $5) some of which I had never seen. Several of these colors will be showing up in videos I have planned for the next few months.
 

The colors I got are: Sunflower
Windsor Blue
Pacific Blue
Apple Green
Tropical Green
Violet
Vanilla
Peach

I was also almost out of TLS so I picked up another bottle of it while I was there. Especially since there was a 50% off coupon this week to use on it. All in all a great trip and so nice to find a store that actually has Fimo on the shelf.

Sunday, June 10, 2012

Wooden Fruit Crates


This week I am making the wooden fruit crates that I put the asparagus in a few weeks ago. I really like how this project turned out. I was working from memory trying to re-create the fruit crates from my childhood. You see when I was a little girl every summer we would take several trips to both eastern Washington and also up to Hood River Oregon to buy ripe fruit. We usually made the first trip sometime in July for cherries and the last one sometime in either September or October for apples. My dad would gather up the fruit boxes from the last trip and put them in the back of the station wagon and off we would go. When we found the fruit that we would purchase dad would trade the boxes we had for the one holding the new fruit and avoid having to pay for the boxes again. We would drive home and mom would spend the next few days canning the fruits we had purchased so we could enjoy them all winter long. Anyway, those were the boxes I wanted for my fruit stand. Of course we no longer have any of the old boxes around here so I worked from memory and pictures on the internet. I hope you enjoy the result as much as I do.

Now on to the how we do this.

We need some pieces of basswood for this in the following sizes:

1/8” by 1/8” square
cut 2 pieces 1” long
4 pieces 1/2” long

1” by 1/16”
cut 1 piece 1 1/2” long

1/4” by 1/16”
cut 4 pieces 1 ½” long

We also need a jumbo craft stick
cut 2 pieces 1” long


For glue I am using both regular tacky glue and zap-a-gap CA glue. I did find that my Quick Grab Tacky just didn't work very well for this project.

I am using a magnetic gluing jig to hold the pieces square, you do need work carefully and make sure your box goes together (and stays) square. A gluing jig is a very helpful tool for this. If you don't have one I do know people also use legos to form a nice square jig for gluing. I can't find any of the legos my older sons used to play with so I can't show you how this works today. If I can find them I will show that in a future video. 


For my farm stand I am going to use the boxes plain, to look like they are new boxes. For a little fun bonus on the video I also made an “old box” with an antique label. Just use your favorite search engine to find the images of the labels online, copy and paste them in a word document (or whatever type of program you have to this type of thing in) and re-size the image to fit the end of you box. Then print, cut it out, glue it on and age it to look as old as you like. 

Sunday, June 3, 2012

Mini Yellow Onions


Honestly this week there almost wasn't a video, I was working on several ideas but none of them were coming together the way I wanted. At the last minute on Friday morning I decided to do the yellow onions. I wasn't totally pleased with the end result but they are close.

Maybe it would help to give you all a bit of insight into how I come up with the projects that I do in the videos.

Once a topic is decided upon (in this week's case the onions) I first go through my collection of items I have made in the past and look at any I have made in the past. I then look through my notes ( I have stacks of notes both in notebooks and on note-cards in a file box) of how I have made things. Next I go through my ridiculously large collection of books and magazines that have miniatures in them to see how other people make the item. My next stop is to look for pictures of the item both online and in my files of saved pictures. Then I pull out the real thing if at all possible. I then start playing with all of these ideas and come up with how I do it, sometimes my method will be close to something I read and sometimes I go completely my own way.

With today's onions I found several projects in my search. I also had some I had made about 5 or 10 years ago. Unfortunately I must have assumed that the process was obvious because I couldn't find any notes on how I had made mine. By closely examining them I was able to figure it out for the most part and I am confidant that these are made the same way.

Several of the instructions I found in my collection had you start with a cane of the caramel color clay and add the thin snakes of the other colors to it. I have to agree that would be a lot faster but I think you loose a lot of the translucency of the skin that way. To me they just look to heavy when done that way. I like the look of using the very thin skin of striped clay over the light color core.

As I was editing the video this week I noticed that I forgot to tell you to get out a real onion and really look at it before you begin. I did have 4 onions in a bowl on my work table to refer to as I worked. That really is helpful when you are making food, try to have a model on hand.

Okay, lets talk about those pictures that I added to the end of the video:

Here we have Mrs. Doll bringing in a basket filled with the onions.
I think the completed basket looks fairly good, I ended up with enough onions to fill two baskets. LOL 

Now where on the table should she put them?

I really need to start on the building so I can make the display tables that will be in there. I really need the building at least partly done so I can judge the size of the tables more accurately. I have a pretty good idea of what they will look like and how they will go together I just need to get the size so I can start. 
A close up of the basket of onions. 


This is a different basket than I showed you how to make last week. I will get a video done later on for this one too. 

Be sure to request what you want to see on the videos.